| What is a Herbarium? | Specimen Label Information |
| What Are Specimens? | Specimen Longevity |
| Why Preserve Plant Specimens? | Specimen Restoration: A Case Study |
 A
herbarium (herbaria, plural) is a repository, a facility designed to ensure
long-term preservation of scientific plant samples, generally referred to as
specimens. The most meaningful analogy is to a library; herbaria are plant libraries,
with the specimens corresponding to the pages in books. Most herbaria are under
the aegis of an academic institution, museum or botanical garden. The University
of Iowa Herbarium is an institutional facility administered through the Department
of Biological Sciences and the College of Liberal Arts and Sciences. IA is the
official acronym assigned to this Herbarium in the directory to the world's
herbaria, Index Herbariorum (Holmgren et al. 1990 and http://www.nybg.org/bsci/ih/).
A
herbarium (herbaria, plural) is a repository, a facility designed to ensure
long-term preservation of scientific plant samples, generally referred to as
specimens. The most meaningful analogy is to a library; herbaria are plant libraries,
with the specimens corresponding to the pages in books. Most herbaria are under
the aegis of an academic institution, museum or botanical garden. The University
of Iowa Herbarium is an institutional facility administered through the Department
of Biological Sciences and the College of Liberal Arts and Sciences. IA is the
official acronym assigned to this Herbarium in the directory to the world's
herbaria, Index Herbariorum (Holmgren et al. 1990 and http://www.nybg.org/bsci/ih/).
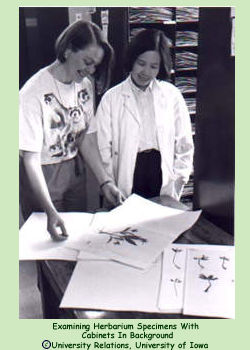
Most
herbaria are housed in a room full of specially designed steel cases (herbarium
cabinets), which are visible in the accompanying photograph of the University
of Iowa Herbarium. Typically, the interior of the cabinets is divided into two
vertical sections and each section is subdivided into 13 compartments. Herbarium
cabinets are lined up side-by-side in rows, and they take up considerable space
because there must be sufficient room for the doors to open between rows. In
recent years, some herbaria, particularly larger ones, have installed mobile
shelving (compactors), placing rows of cabinets or compartmentalized shelving
on tracks. The rows are moved via manual or electrical systems, opening a single
aisle (between rows) at a time. By utilizing almost all of the ‘aisle space’
(that has to be left between rows of immobile cabinets), compactors significantly
increase the number of cabinets/shelving that can be accommodated within a finite
space.
Herbarium specimens are plants that have been collected and preserved for scientific
analyses.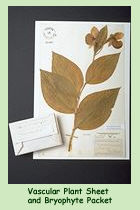
Specimens include:
2) Dried Plants
3) Plants Preserved in Alcohol-Glycerine or Formalin Solution
Most vascular
plant (flowering plants, conifers, ferns and fern allies) specimens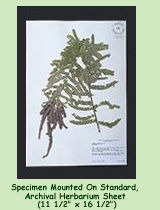 are pressed and dried plants that are mounted on stiff
sheets of paper. A simple device, a plant press, is utilized to prepare
specimens. It is comprised of two, 12" x 18" lattices of ¾" wide x ¼" deep strips
of wood (6 across and 5 lengthwise) between which are sheets of corrugated cardboard
(‘ventilators’), felt blotters and folded sheets of unprinted newsprint. Plants
are laid out within the folded newsprint, with blotters and ventilators above
and below. Numerous plants can be pressed at one time by stacking the newsprint/blotter/ventilator
units. The wooden lattices are placed on the top and bottom of the stack, and
two nylon or canvas web straps are used to bind the press together and apply
pressure to squeeze water out of the plants. Plants are left in the press until
they are thoroughly dry as a result of air drying or use of a plant dryer (a
metal cabinet with openwork shelves spaced to accommodate plant presses, and
a simple electrical heating device and a fan in the bottom).
are pressed and dried plants that are mounted on stiff
sheets of paper. A simple device, a plant press, is utilized to prepare
specimens. It is comprised of two, 12" x 18" lattices of ¾" wide x ¼" deep strips
of wood (6 across and 5 lengthwise) between which are sheets of corrugated cardboard
(‘ventilators’), felt blotters and folded sheets of unprinted newsprint. Plants
are laid out within the folded newsprint, with blotters and ventilators above
and below. Numerous plants can be pressed at one time by stacking the newsprint/blotter/ventilator
units. The wooden lattices are placed on the top and bottom of the stack, and
two nylon or canvas web straps are used to bind the press together and apply
pressure to squeeze water out of the plants. Plants are left in the press until
they are thoroughly dry as a result of air drying or use of a plant dryer (a
metal cabinet with openwork shelves spaced to accommodate plant presses, and
a simple electrical heating device and a fan in the bottom).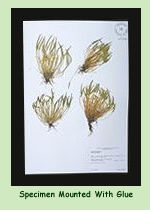
Various
techniques are employed to attach the dry, and therefore fragile, plants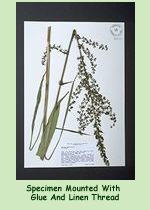 to the mounting sheets. The most common method is to use an archival
adhesive similar to white glue and, if
necessary, heavier portions of the plant are supported additionally by linen
thread,
or narrow strips of gum-backed
linen tape or polyester film (e.g., Mylar). If there are loose seeds or
fruits, these are placed in a small fragment
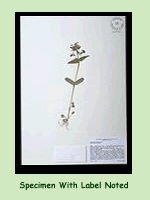
packet, which also is glued to the sheet. A label,
which generally includes the Latin name of the plant, the locality where it
was collected, information on habitat, name of the collector and date
to the mounting sheets. The most common method is to use an archival
adhesive similar to white glue and, if
necessary, heavier portions of the plant are supported additionally by linen
thread,
or narrow strips of gum-backed
linen tape or polyester film (e.g., Mylar). If there are loose seeds or
fruits, these are placed in a small fragment
packet, which also is glued to the sheet. A label,
which generally includes the Latin name of the plant, the locality where it
was collected, information on habitat, name of the collector and date 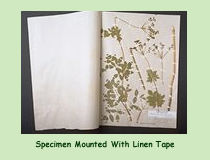 of
collection, is
attached in the lower right corner of the sheet (see Specimen
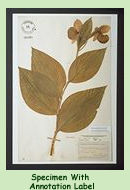
Label Information for further details). If a knowledgeable individual subsequently
examines the specimen, they may add an annotation,
a small
of
collection, is
attached in the lower right corner of the sheet (see Specimen
Label Information for further details). If a knowledgeable individual subsequently
examines the specimen, they may add an annotation,
a small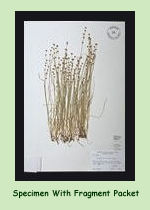 strip of paper on which they indicate agreement with the original identification
or suggest an alternative. Usually, the sheet is stamped or embossed with
the name of the herbarium
strip of paper on which they indicate agreement with the original identification
or suggest an alternative. Usually, the sheet is stamped or embossed with
the name of the herbarium
 (including
the official herbarium acronym - IA, for
the University of
Iowa Herbarium), and a unique accession number, which reflects total collections
at the time each specimen is added. T
(including
the official herbarium acronym - IA, for
the University of
Iowa Herbarium), and a unique accession number, which reflects total collections
at the time each specimen is added. T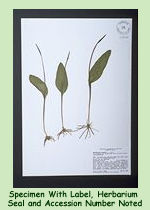 he
sheets are placed in manilla folders and these are stacked in the compartments
of
the herbarium cabinets or shelving.
he
sheets are placed in manilla folders and these are stacked in the compartments
of
the herbarium cabinets or shelving.
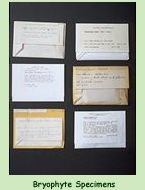
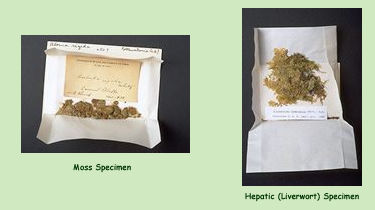
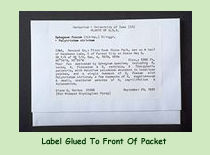 The
only plants that are
not pressed are the small bryophytes (mosses,
hepatics or liverworts, and hornworts) which are dried and placed loose
in folded packets.
The label with the collection information is glued on the front
of the packet and the packets are filed loose in boxes the shape of (or
often in reality!) shoe boxes; glued to sheets of mounting paper; or placed
loose in manilla folders.
The
only plants that are
not pressed are the small bryophytes (mosses,
hepatics or liverworts, and hornworts) which are dried and placed loose
in folded packets.
The label with the collection information is glued on the front
of the packet and the packets are filed loose in boxes the shape of (or
often in reality!) shoe boxes; glued to sheets of mounting paper; or placed
loose in manilla folders.
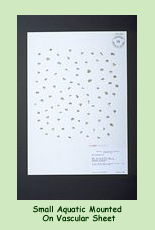
Traditionally, small aquatic plants, for example, duckweed, have been preserved in formalin in jars, or floated onto sheets of paper by the collector, then pressed and dried, and mounted on sheets as with other vascular plants. More recently, a solution of alcohol-glycerine has replaced formalin, because the latter is a carcinogen, and archival jars are utilized. These plants also may be dried and placed loose in ‘moss’ packets, which can be glued on mounting sheets.
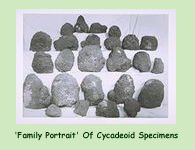
The rock
in which a fossil plant is
preserved is numbered and a record of the collection
information for each number is  stored
separately.
stored
separately.
The University
of Iowa Herbarium is a repository for dried and fossil plant specimens from
all over the world, but the primary focus is Iowa and North America. There are
approximately 175,000 collections of vascular plants, 80,000 bryophytes, and
5,000 fossils. This Herbarium is larger than 92% of nearly 600 herbaria in the
United States (data from P. Holmgren, Editor, Index Herbariorum, e-mail 3/2002),
and it houses
the only major
collections of bryophytes and fossils in the state.
Herbarium
specimens are a vital resource because they store a wealth of information. They
are utilized by faculty, staff and students in universities, colleges and other
research institutions; by personnel from government agencies and conservation
organizations; and the general public.
Specimens
are utilized for:
•
TAXONOMIC
RESEARCH, including preparation of monographs and revisions, and floras, manuals
that provide species descriptions, aid in identification, and document occurrence.
Specialists utilize collections to document the range of variation that characterizes
individual species, so that species can be accurately circumscribed in descriptions.
For example, the collections are routinely consulted by taxonomists preparing
treatments for the multi-volume Flora of North America.
•
CURRENT AND
HISTORICAL DISTRIBUTIONAL DATA. Specimens provide the earliest documentation
of the natural vegetation of Iowa, as well as documenting the ranges of indigenous
species, and the introduction and naturalization of alien species. For example,
The Vascular Plants of Iowa by Eilers and Roosa (1994) is based primarily on
collections' data in the three herbaria at the University of Iowa, Iowa State
University and the University of Northern Iowa.
•
RARE PLANT
LISTS. Specimens have been the primary source of data for the Iowa Administrative
Code lists of Endangered and Threatened Plant Species published in 1977, 1984,
1986, 1988 and 1994.
•
IDENTIFICATION
OF 'UNKNOWN' PLANTS, including macrofossils and anthropological remains, by
making comparisons with identified specimens. Collections are routinely consulted
because many species cannot be confidently identified on the basis of comparison
with a line-drawing or photograph.
•
GENERATING
A 'SEARCH IMAGE'. Even though specimens are altered because they have been pressed
and dried, they are useful for getting a mental image of the general size and
appearance of a plant that one never has seen, but wishes to find. This is useful
for finding new records of rare species.
•
LOCALITY AND
ECOLOGICAL INFORMATION. The locality data recorded on specimen labels is a resource
for those who wish to see a particular species in its natural habitat, or for
those who would like to see an example of a particular type of habitat. Ecological
information on specimen labels is useful for getting an idea of the type of
habitat to search for a particular species.
•
GENETIC DATA.
DNA can be extracted from herbarium specimens and utilized for genetic analyses.
•
VOUCHER SPECIMENS.
Some specimens are deposited specifically for the purpose of documenting research.
'Type' specimens, the original specimen(s) that are the basis for descriptions
of new species, are the permanent record of the entity that was described. No
matter what the original description says, it is the identity of this specimen
that determines what the name represents. Researchers whose studies are not
specimen-based (for example, physiologists or geneticists) nevertheless utilize
voucher specimens to document the subject of their investigations. If questions
arise about the identity of the organism, the voucher can be examined to check
the validity of the original identification.
•
UNDERGRADUATE
EDUCATION. The
University of Herbarium and specimens are part of the curriculum for 26
courses, 10 to 15 of which are offered on a regular basis, and involve 250-400
students per year.
Specimen
labels may include information on 1) location, 2) habitat, 3)
collector and date of collection, and 4) identification. The first
of these, location, is essential. Without locality data, a specimen
is worthless!
Collectors must provide adequate, accurate information on locality if specimens are to have lasting value. The following should be included:
country
state/province
county
specific information on how the locality can be reached (distance to nearest town, river crossing, highway intersection or other landmark, and number of the road/highway along which a locality is situated)
township, range, section, quarter-section
latitude and longitude
elevation
Information on habitat is useful. This can include a general description of the type of habitat (e.g., forest, rock outcrop, prairie, wetland, etc.); substrate type (e.g., calcareous, siliceous rock), if pertinent; names of associated species; and specific notes on the microhabitat in which the plant was collected (e.g., on exposed soil, on trunk of Quercus macrocarpa 1.5 m from ground, etc.).
The name of the collector and collection number, if any, and the date of collection (do not abbreviate; write out name of month and include the century) should be clearly indicated. The names of persons who accompanied the collector may be included in parentheses, but these should be put on a separate line below the collector's name.
If
the specimen has been identified, the name of the species and the person who
identified it (if other than the collector) should be included. If the collection
is a voucher for a research report or publication, this should be noted (eg.,
Voucher for Survey of Iowa Fen Bryoflora).
The above information, in hand printed (legible!) or typed form, should be given to the herbarium where the specimen(s) will be deposited. These days, it is relatively easy to use a word processing program to set up a simple template that can be used to generate six, standard size (ca. 4" x 3") labels on an 8 ½" x 11" sheet of paper (two columns of three). If a number of labels from a single locality are needed, mail merge programs can be used, and commercial programs also are readily available. Label files can be provided on disk, so that the repository can run the labels on acid-free, pH-neutral paper, using a printer of their choice. The University of Iowa Herbarium uses a Lexmark Z52 inkjet printer because waterproof ink, which may be more permanent than some laser jet inks, is available for that printer. If printed labels are provided to a repository, materials that conform to their standards should be used if at all possible.
University of Iowa Herbarium labels are formatted as per the following example:
Potentially,
herbarium specimens will last in perpetuity. The earliest
specimens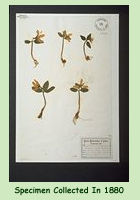 in the University of Iowa Herbarium are over 100 years old, and older herbaria
have some that are 300 years old. Several factors can affect longevity and quality
of specimens, including 1) archival materials, 2) specimen restoration,
and 3) insect control.
in the University of Iowa Herbarium are over 100 years old, and older herbaria
have some that are 300 years old. Several factors can affect longevity and quality
of specimens, including 1) archival materials, 2) specimen restoration,
and 3) insect control.
At
present, every effort is made to utilize archival materials; for example, pH-neutral
paper and glue. However, the deleterious effect of acidic materials (paper becomes
very fragile and eventually crumbles) was not recognized until relatively recently,
so specimens from the first half of the 20th century usually are mounted on
acidic paper with various acidic glues, including "mucilage" (animal-based
glue with pH around 5), 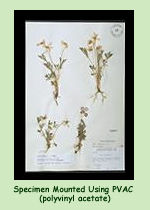 polyvinyl
alcohol (pH 4.5-7), and PVAC (polyvinyl acetate), which releases acetic acid
(pers. comm., Julia Golden, Curator, University of Iowa Paleontology Repository).
In the middle of the 20th century, the use of rubber cement (e.g.
Ducco Cement) to attach specimen labels created a different type of problem.
Although clear when applied, rubber cement turns brown with age (after approximately
15 years), staining through the label and making it very difficult to decipher
the information. Rubber cement also degenerates with age, losing its adhesive
properties, so labels eventually peel off.
polyvinyl
alcohol (pH 4.5-7), and PVAC (polyvinyl acetate), which releases acetic acid
(pers. comm., Julia Golden, Curator, University of Iowa Paleontology Repository).
In the middle of the 20th century, the use of rubber cement (e.g.
Ducco Cement) to attach specimen labels created a different type of problem.
Although clear when applied, rubber cement turns brown with age (after approximately
15 years), staining through the label and making it very difficult to decipher
the information. Rubber cement also degenerates with age, losing its adhesive
properties, so labels eventually peel off.
If specimens have not been properly mounted, for example, if a plant was not thoroughly fixed to the sheet when it was originally mounted, or if portions have come loose over time, the loose parts can be damaged readily because they are so fragile. Less common problems include dusty mounting sheets and sheets that have deteriorated because of acid degradation or mercuric chloride stains. Loose specimens and dirty mounting sheets can be repaired relatively efficiently, while replacement of mounting sheets is a more lengthy process. (See Specimen Restoration: A Case Study.)
A perpetual threat to the longevity of herbarium specimens is insects, a number of which find dried plants palatable. Historically, various methods have been used to kill insects, which either come in with the plants when they are collected (the insects either aren’t killed by the drying process or such reproductive stages as eggs survive), or are in the building where the plants are stored. The classic line of defense against insect predation was moth balls (naphthalene or paradichlorobenzene), which were placed in the storage cabinets with the specimens. Use of these has been discontinued in many herbaria only relatively recently (1980s) since the detrimental health effects were recognized. The moth ball odour is one that many still would associate with herbaria. In the 1950s and early 60s, moth balls were in use in the University of Iowa Herbarium, but as an additional defense, many specimens were painted with an alcoholic solution of mercuric chloride (at that time, people were unaware of the health hazard posed by mercury). Such specimens bear a red stamp, ‘poisoned’, and are characterized by a more-or-less evident gray stain that forms a halo around the plant. Surface sample analyses of mounting paper from ‘poisoned’ specimens indicate residual mercury is present, although the amounts are below current permissible limits, according to the University of Iowa Health Protection Office, which carried out the analyses. One of the most recent techniques for dealing with the insect problem is freezing. At the University of Iowa Herbarium, new specimens are frozen for one to two weeks prior to insertion; existing collections are rotated through the freezer periodically; and an air handling system maintains the temperature of the storage room at 60o F year-round. Over the last 10 years, these two methods – freezing and temperature control - have been extremely effective, virtually eliminating insect predation.
In 1997, Jennifer Bell, then Assistant Curator of the University of Iowa Herbarium, initiated a project to restore historically significant specimens. It was inspired by Walker and Hughes’ (1994) report of a cooperative project between curators of the Royale Herbarium at the National Museums and Galleries at Merseyside, Liverpool, Great Britain and staff of the Paper Conservation Section of the Institute of Paper Conservation, to remount botanical specimens. Ms. Bell was in the unique position of being able to provide both skills, since she has extensive experience in mounting plants and also in paper conservation techniques. The project was funded by a grant from the State Historical Society, Inc. in Iowa City, and the focus was specimens of state listed species (i.e., those included on the 1994 list of Endangered and Threatened Species (Iowa Administrative Code 1994) collected by Thomas H. Macbride and Bohumil Shimek, both of whom were among the earliest collectors in Iowa.
As
noted above (see Specimen Longevity), various factors
can reduce the longevity of herbarium specimens. The primary factors affecting
some Macbride and Shimek specimens 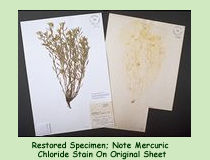 (many
are in excellent condition) are dirt on the mounting sheets, loosening of the
attachment of plants to the sheets, and deterioration of the sheets as a result
of ‘poison’ stains from treatment with mercuric chloride, and/or acid degradation
of the paper (yellowing and, in extreme cases, crumbling).
(many
are in excellent condition) are dirt on the mounting sheets, loosening of the
attachment of plants to the sheets, and deterioration of the sheets as a result
of ‘poison’ stains from treatment with mercuric chloride, and/or acid degradation
of the paper (yellowing and, in extreme cases, crumbling).
Dirty (dusty) mounting sheets were dealt with most readily. They were dry cleaned with a Staedtler Mars Plastic eraser. The eraser was fine-grated with a nutmeg grater, and a small amount was placed on the soiled area and gently rubbed with a circular motion using the palm of the hand. After the eraser granules picked up dirt, they were removed with a fine brush, and this step was repeated until the dirty areas were completely clean. If a plant had come loose from the sheet, that too was relatively simple to deal with. A microspatula was used to reapply archival white glue to the underside of loose areas, and linen thread and fine strips of linen tape were used to attach bulkier and/or heavier structures. The most difficult, and time-consuming, specimens were those that required removal from the original mounting sheet and mounting on a new sheet.
The
protocol for removal of specimens from the original mounting sheet and remounting
requires patience and considerable skill, but it is interesting to see what
can be done. Prior to beginning the process of removal of the plant and documentation,
the original mounted specimen was photographed. To begin the 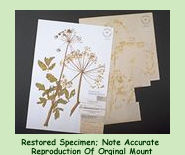 removal
process, the first step was to remove all written documentation (original label
and annotations) with scissors or a mat knife (e.g., Exacto knife). Subsequently,
removal of the documentation from the mounting sheet was accomplished by wet
removal, solvent removal or mechanical means, depending on the type of adhesive
(i.e., soluble in water or alcohol) and whether the inks were soluble in water.
The documents were then placed between Hollytex (a light, spun, polyester
fabric that can be used to protect specimens and documents during drying because
it won’t adhere to them, cf. Walker and Hughes, 1994) and blotters, and
placed under two, 15 pound lead weights overnight to dry and flatten them.
removal
process, the first step was to remove all written documentation (original label
and annotations) with scissors or a mat knife (e.g., Exacto knife). Subsequently,
removal of the documentation from the mounting sheet was accomplished by wet
removal, solvent removal or mechanical means, depending on the type of adhesive
(i.e., soluble in water or alcohol) and whether the inks were soluble in water.
The documents were then placed between Hollytex (a light, spun, polyester
fabric that can be used to protect specimens and documents during drying because
it won’t adhere to them, cf. Walker and Hughes, 1994) and blotters, and
placed under two, 15 pound lead weights overnight to dry and flatten them.
In view of the fragility of dried plant specimens, it was necessary to prepare the plant for removal from the mounting sheet by humidifying it to make it somewhat pliable. Humidification was carried out using a 16 x 20 Cesco-Lite photo developing tray as a chamber. A 3/8" egg-crate white ceiling tile was set in the tray and hot water was poured in to a level below the ceiling tile. The mounted specimen was sandwiched between two lengths of Hollytex and this unit was laid on the tile. To maintain high relative humidity, the tray was covered with an acrylic sheet for 10 to 24 hours. The Hollytex helped prevent the mounting sheet from wrinkling or puckering, and it also protected the specimen from condensation that formed on the acrylic sheet.
After humidification, the plant was removed carefully from the mounting sheet with a paper lifter (a thin and flexible, smooth wooden spatula). Subsequently, the unmounted plant was placed between two layers of Hollytex, two layers of blotters, and two layers of ventilators (corrugated cardboard), and this unit was placed under two, 15 pound lead weights for 24 hours to dry and flatten. The original mounting sheet was dried and flattened in the same manner as the plant, and subsequently saved to serve as a reference for positioning the specimen on the new sheet.
The plant specimen and documents were laid out on a new mounting sheet of 100%, all-new cotton fiber with a neutral pH of 7.0-8.0 and buffered to resist external acid contamination. To replicate as closely as possible the original position of the plant and documents, the photograph of the original mount, and the original mounting sheet, were used as references. Once the layout had been finalized, the specimen was adhered with archival glue solution applied with a Chinese calligraphy brush (#2). Documents, including labels and any inscriptions cut from the original mounting sheet, were glued on the new mounting sheet in their original positions. Any plant fragments, seeds or fruits were placed in new acid-free fragment packets and also glued on the new sheet. Stamps, seals, and the original accession number were applied in their original places.
For this project, 348 Macbride and Shimek specimens of species that currently are classified as Endangered or Threatened in Iowa were evaluated. Approximately 12% of the specimens required no treatment; 76% required only minor repairs; and 7% required remounting.
Minor
repairs (dirt removal, and gluing and stitching loose plant parts) can be accomplished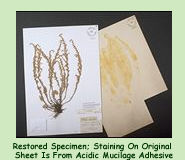 relatively quickly, taking approximately forty-five minutes per specimen. Remounting
is a much more time-consuming process that takes 4 to 6 hours per specimen,
and requires the skills of a professional paper conservator; however, the results
are impressive. As is evident from the accompanying photographs, it would be
difficult to distinguish the new mount from the original, at the time the original
was done.
relatively quickly, taking approximately forty-five minutes per specimen. Remounting
is a much more time-consuming process that takes 4 to 6 hours per specimen,
and requires the skills of a professional paper conservator; however, the results
are impressive. As is evident from the accompanying photographs, it would be
difficult to distinguish the new mount from the original, at the time the original
was done.
There are approximately 25,000 Shimek (mainly) and Macbride specimens in the University of Iowa Herbarium. If it is assumed that the specimens examined in the course of this project are representative, it is estimated that it would take approximately 7200 hours to repair the remainder. Restoration is a labour-intensive process!
Literature Cited
Holmgren, P.K., N.H.
Holmgren & L.C. Barnett. 1990. Index Herbariorum. Part I: The herbaria of
the world (8th ed.). Regnum Vegetabile 120: 1-693.
Iowa Administrative Code. 1994. Endangered and Threatened Plant and Animal Species.
Natural Resource
Commission [571], Chapter 77. 13 pp.
Walker, N. & D. Hughes. 1994. Conservation and the herbarium: the Royale Herbarium – a conservation approach, pp. 35-41. In: R. E. Child (ed.), Conservation and the Herbarium. Institute of Paper Conservation, Leigh, Worcestershire, Great Britain. 41 pp.
Last Updated: 03/15/2003